Tuesday, October 24, 2017
Wednesday, October 18, 2017
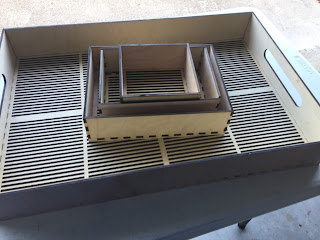
Pupae Sifting Trays
A couple months ago I watched a video on Youtube showing an amazing machine that automatically sorted all stages of mealworms. I was impressed by the ingenuity of it all, and I focused my efforts on trying to figure out how in the world they were able to separate pupae from the rest of the worms.
And then I saw it..
Slotted rails!
I watched as pupae vibrated down a series of long metal rods, while the worms all fell through the slots and down into different sized containers. This was it!
Mealworm farmers have always wondered how to quickly separate their pupae. Most do it by hand (which is therapeutic to some; tedious to others), and some just leave the pupae in with the worms until they turn into beetles. But I knew there had to be a better way!
And so began my quest to build a sifting tray that was able to separate pupae like I had seen that $3,000 machine do so well. I first combed the forums and left questions in Youtube comments, trying to figure out how wide the slots needed to be. Eventually I had it narrowed down to somewhere between 3 and 4 millimeters.
I wanted to test the slot thickness before I spent lots of material to build a completed tray, so I used a 3D modeling program to design a basic grid of skinny rectangles. I ended up only having to print 2 or 3 prototypes before I zeroed in on the exact slot width I needed.


Next, I framed the base with four walls and did a test print. O.M.G. did it work! I immediately posted my results in some Mealworm Farming groups on Facebook and it was a hit. Genius! Amazing! I want one! So many positive responses I knew I was on to something good.

And so began my quest to find a way to build pupae sorting trays that were large enough to handle my needs, and possibly the needs of future customers. I visited a local Fabrication Lab to see if they had larger 3D printers. When I got there I was talked into considering other options, such as using plastic molding and laser cutting wood. I researched both options and decided that laser cutting would be the fastest and cheapest option. I then spend a day or so teaching myself how to use this new design software, and came up with a simple, yet ingenious design. I used notches in the sides of the walls and bottom that locked into place like puzzle pieces. With a bit of wood glue, they were supposedly super strong and sturdy - just what I was looking for!


I had to drive 47 miles north to a Fab Lab that had the laser cutter, and was taught the basics of how to operate the machine. After cutting and assembling my first model I made a couple minor changes (width of the notches, mainly) and created a couple videos showing them in action.
Again, I was showered with praise and requests to purchase one. So I created a Google Form survey for prospective customers. I figured this was the best way to determine the size and cost customers were hoping for. After 88 completed surveys I looked at all the data and came up with a price structure that covered the costs of building and shipping, while also paying me fairly for my time and effort.

I decided on four different sizes and prices, with the option for custom engraving and assembly. Another Google Form went out, this time allowing customers to actually place and pay for their orders.
And so begins my current situation. Right this moment I am sitting in the garage of a Fab Lab, waiting for 20 trays to finish being cut.

There have been a handful of minor obstacles that have gotten in my way (including a funeral, a wood glue debacle, and a crazy laser cutting learning curve), but I am starting to see the light at the end of this tunnel. I have always been a project-oriented person, so I am loving every moment of this, no matter how trying it seems at times. Hopefully my first batch of customers love their new sifting trays and help promote them to other mealworm farmers. I consider all of us a giant community who care about each other. We share tips, give advice, and mourn the loss of worms whenever pests take over. It's not a hugely rewarding hobby, but I wouldn't give it up for anything!
If you would like to place an order for your own Pupae Sifting Tray, please click HERE.
And then I saw it..
Slotted rails!
I watched as pupae vibrated down a series of long metal rods, while the worms all fell through the slots and down into different sized containers. This was it!
Mealworm farmers have always wondered how to quickly separate their pupae. Most do it by hand (which is therapeutic to some; tedious to others), and some just leave the pupae in with the worms until they turn into beetles. But I knew there had to be a better way!
And so began my quest to build a sifting tray that was able to separate pupae like I had seen that $3,000 machine do so well. I first combed the forums and left questions in Youtube comments, trying to figure out how wide the slots needed to be. Eventually I had it narrowed down to somewhere between 3 and 4 millimeters.
I wanted to test the slot thickness before I spent lots of material to build a completed tray, so I used a 3D modeling program to design a basic grid of skinny rectangles. I ended up only having to print 2 or 3 prototypes before I zeroed in on the exact slot width I needed.


Next, I framed the base with four walls and did a test print. O.M.G. did it work! I immediately posted my results in some Mealworm Farming groups on Facebook and it was a hit. Genius! Amazing! I want one! So many positive responses I knew I was on to something good.

And so began my quest to find a way to build pupae sorting trays that were large enough to handle my needs, and possibly the needs of future customers. I visited a local Fabrication Lab to see if they had larger 3D printers. When I got there I was talked into considering other options, such as using plastic molding and laser cutting wood. I researched both options and decided that laser cutting would be the fastest and cheapest option. I then spend a day or so teaching myself how to use this new design software, and came up with a simple, yet ingenious design. I used notches in the sides of the walls and bottom that locked into place like puzzle pieces. With a bit of wood glue, they were supposedly super strong and sturdy - just what I was looking for!


I had to drive 47 miles north to a Fab Lab that had the laser cutter, and was taught the basics of how to operate the machine. After cutting and assembling my first model I made a couple minor changes (width of the notches, mainly) and created a couple videos showing them in action.
Again, I was showered with praise and requests to purchase one. So I created a Google Form survey for prospective customers. I figured this was the best way to determine the size and cost customers were hoping for. After 88 completed surveys I looked at all the data and came up with a price structure that covered the costs of building and shipping, while also paying me fairly for my time and effort.

I decided on four different sizes and prices, with the option for custom engraving and assembly. Another Google Form went out, this time allowing customers to actually place and pay for their orders.

And so begins my current situation. Right this moment I am sitting in the garage of a Fab Lab, waiting for 20 trays to finish being cut.

There have been a handful of minor obstacles that have gotten in my way (including a funeral, a wood glue debacle, and a crazy laser cutting learning curve), but I am starting to see the light at the end of this tunnel. I have always been a project-oriented person, so I am loving every moment of this, no matter how trying it seems at times. Hopefully my first batch of customers love their new sifting trays and help promote them to other mealworm farmers. I consider all of us a giant community who care about each other. We share tips, give advice, and mourn the loss of worms whenever pests take over. It's not a hugely rewarding hobby, but I wouldn't give it up for anything!
If you would like to place an order for your own Pupae Sifting Tray, please click HERE.
Monday, September 18, 2017
Hurricane Irma Aftermath
Phew!
When we decided to evacuate I was so worried about the thousands of mealworms we left behind. All that work... all that time.. Would they survive? Would they be scattered all over my garage floor when I returned? Would I have to start all over?
Well we thankfully lucked out and received minimal damage to our property. And it turns out that mealworms absolutely love staying in garages during a hurricane! They thrived in the extra humidity - so much that I had to create three new beetle trays for all of the pupae I collected. About 2,800 in one week for anyone keeping score.
 Shortly after returning home a buddy of mine told me about a Wild Bird Rehab Center down in the Keys that had been heavily damaged. Feeling blessed that my mealies had survived the storm, I felt it was only right to send some worms their way to help replace what might have been lost. I also encouraged several other national mealworm farmers to do the same.
For more information on the damaged rehab center, click here.
When we decided to evacuate I was so worried about the thousands of mealworms we left behind. All that work... all that time.. Would they survive? Would they be scattered all over my garage floor when I returned? Would I have to start all over?
Well we thankfully lucked out and received minimal damage to our property. And it turns out that mealworms absolutely love staying in garages during a hurricane! They thrived in the extra humidity - so much that I had to create three new beetle trays for all of the pupae I collected. About 2,800 in one week for anyone keeping score.

For more information on the damaged rehab center, click here.
Sunday, September 3, 2017
Current Prices
Below are my current mealworm prices. If you live on the Space Coast (Brevard County, FL) delivery is free. We can arrange to meet somewhere or I can leave them at your doorstep. All other orders in the continental US will have a flat shipping rate of about $7.50.
The easiest way to order is to send an email to spacecoastmealworms@gmail.com or text me at 321.652.9097. Please also check out my Facebook page for sale announcements and other info.

The easiest way to order is to send an email to spacecoastmealworms@gmail.com or text me at 321.652.9097. Please also check out my Facebook page for sale announcements and other info.
I accept cash, PayPal, Venmo, or Google Wallet for purchases.
Six Months of Growth
From measly beginnings to commercial sized mealworm farm...
When I first planned to order mealworms I only wanted to save money. I was tired of buying the freeze-dried kind for my chickens and began watching Youtube videos to learn how to raise my own. In February 2017 I purchased 5,000 worms from a huge distributor in California. I had researched the life cycles and best practices for rearing these worms, and I had devised a master plan - I was going to order 5,000 mealworms for three months in a row, thereby staggering the cycles of my worms. This way I would always have worms in various stages of life, and would never be without feeders to offer my chickens. So I ordered 5,000 in February, March, and April. I found these rainbow drawer towers at Sam's Club for about $25, and decided they would be perfect to use for this system (which I also designed).

As the weeks and months went by, I joined more and more Facebook mealworm farming groups and had networked with several farmers across the country. The idea of going big was growing, which meant my farm needed to grow as well. I used my birthday money to build new towers for my worms. This new tower quadrupled my storage space by having larger and taller bins. The bins are basic $6 cement-mixing tubs from Home Depot, and the wood and screws cost about 40 bucks.

At this point I collect a new tray of eggs and produce 3000-5000 worms each week. Every worm I don't sell is simply left to pupate and turn into a beetle, which will be used to lay more eggs and grow my farm even larger. The ultimate goal is to sell enough to pay for a shed or a small rental space where I can expand even larger. The only thing I need is time!
Subscribe to:
Posts (Atom)